Showing posts with label wet plate. Show all posts

Sunday, August 21, 2011

A sublime Sunday - Wet Plate and Friends

The Stone Diaries I
wet plate collodion tintype

This morning as I was drinking tea on the studio porch, I was thinking how my day might unfold: make some new tintypes; meet with a dear friend Jan for coffee; make some kallitype prints. Here's how the day has progressed so far (it's late afternoon here).

After a brief ride on the bike, I came back to find the sun full and bright in the back yard - perfect tintype conditions. I made four plates in total: two still lifes and two garden views, working in partly cloudy direct light, full on direct light and open shade. At this stage of my adventures in wet plate collodion, I like to mix and match conditions so that I become better at reading the light for determining exposure times, and also so I can get a better feel for how differences in light change the qualities (depth and contrast in particular) of the resulting images.

For the first plate of the day, I set up a table for still lifes, and picked up two rocks my wife had brought home. Elena has a strong affinity for "special" rocks and often picks up unusual examples based on shape, colours and textures. Once I saw the image on the ground glass, I imagined doing a series of images ("The Stone Diaries"), so I may well have another theme to work with as I continue to deepen my experience with wet plate. I then set up a still life with zucchini, watermelon and a half of an avocado in bright direct light:

Still life with zucchini, melon and avocado
wet plate collodion tintype

Now that I have more experience, I knew based on the still life images I made last week that I should stop down the lens for a 5 second exposure. Creases in the canvas ground provided a geometrical element to the composition that accentuates the organic shapes of the vegetables.

Finally, I did some work in open shade, making two views of the garden: the graceful bend of a japanese maple, and a rock element within the fern bed. I'm learning from these plates that open shade seems to lead to a higher contrast image:

Japanese maple
wet plate collodion tintype

Fern bed
wet plate collodion tintype

I decided to stop and clean up at that point, keeping to this principle of doing "just enough" to strengthen the consistency of my plate pouring, exposure and processing before I get to the point where I lose concentration.

A short while later, my friend Xane called to invite me over to his place for lunch with Jan. Jan is a mutual friend who moved away to Vancouver, so it's always a treat to catch up with her when she comes over to the island for a visit. Such impromptu invitations are unusual in this town, but we're all comfortable enough with each other to get together at a moment's notice. And Xane's place is a little bit of Tuscan peacefulness in the heart of the city suburbs.

We started with a throw back to our childhoods: grilled cheese sandwiches that Xane made with local cheddar and a hearty full grain bread, beans straight from the garden freshly steamed, then small sweets and watermelon. We talked about our childhood memories around food, family gatherings and picnics. After lunch I did a little show and tell of some of my tintypes and photogravure prints. Both Jan and Xane are experienced artists whose knowledge and work I greatly respect, so it was wonderful to get some feedback on this recent work from them. We finished the afternoon draped over the furniture, napping and conversing in complete relaxation.

With coffee turning into a delightful lunch and time spent in conversation, I've only just now returned home. I still hope to complete my pre-visualized day by making a few kallitype proof prints.

Tuesday, August 16, 2011

Zucchini for Edward and Charis

Zucchini
(wet plate tintype)

Yesterday I felt somewhat recovered from the photopolymer gravure workshop, and felt an urge to round out the experience by making a few tintypes. When I walked into the kitchen after getting up, I was confronted with five zucchini freshly harvested from the garden by Elena, including several that were gigantic. After the end of my last wet plate session, I had been thinking that I'd like to embark on a series of still life images as a way solidify my technique and as a visual exercise. The zucchini seemed an ideal subject to work with.

At the moment I'm happy to restrict myself to making about 4-5 plates per session. This restriction allows me to work while I'm still fresh (i.e. before I succumb to the ether fumes! [it's actually not that bad]) which I think is important to strengthening those neural networks and muscle memory I'm building by using consistent technique. Working to the point of being tired will inevitably lead to making mistakes, which come from deviations from consistent working habits and work against the reinforcement of the neural pathways. I'm not worried about making bad plates or having failures per se, but I want to first get down a really consistent working method.

The plate above is the last plate I made yesterday - after working on the wider compositions shown below, I wanted to get in tighter to really emphasize the textures, lines and colour patterns of the zucchini. One of the zucchini had a shape that made me think of a famous nude photograph that Edward Weston took of Charis stretched out sinuously on the sand dunes at high noon. I was making these images at that same time of day, setting up the still lifes on the south facing deck behind the house in bright direct sunlight. So I made this plate as a memento mori of Weston's famous image:

Zucchini for Edward and Charis
(wet plate tintype)

While I was working with the zucchini, I remembered that I had a large etched copper bowl that I had made in a workshop a number of years ago (if you're beginning to think I'm a workshop junky, I understand). I used the bowl as a back drop for some luscious cherries to make this image:

Cherries in a copper bowl
(wet plate tintype)

I think it would have been interesting to make a plate of this set up in open shade, similar to the lighting of the first plate above. However, as I look at these last two images, I'm struck by how much I like this harsher, direct lighting of these still lifes. It reminds me of the lighting one sees in images Weston, Tina Modotti and Manuel Alvarez Bravo made in Mexico.

I'm not pushing any great photographic boundaries by making these still life images, but it is a new way of working for me and I am excited by the endless possibilities. I like these elegant, simple compositions which I think match the seductive qualities of the wet plate process quite well. Looking at the plates a day later, I feel a strong desire to keep making these types of images.

Friday, August 5, 2011

Weekend Wet Plate Adventures

 In the garden

Last weekend I started on my solo wet plate collodion adventure. The day before the weekend arrived, I received a package in the mail from Niles Lund containing my silver bath, developer trays and modified film holders. I was excited about getting started, and in anticipation of getting these final items, I had mixed a batch of salted collodion the day before. It was still quite cloudy, so I also mixed a small batch of a "quick clear" collodion recipe that I found on-line. 

Before I could get started, I needed to source some glass plates and black trophy aluminum. A friend of mine owns a framing store, and I stopped in to ask if they would cut some 4"X5" glass plates for me. He was happy to do so (at no charge!), which pleased me no end since I was assured of having something to work with. I next went to a local trophy store - the people there were very nice and helpful, and I ordered plates in 3.5" X 4.5", 4" X 5" and 7.5" X 9.5" to fit my various holders. No problem, and they would be ready in 30 minutes. That was a pleasant surprise - I was expecting the usual "two to three business days". When I returned the plates were ready, but came with a shocker of a sticker price! At $0.30 per square inch, my order was over $200 before taxes (each 4"x5" plate was $6, each 7.5"X9.5" plate was $20!). Pleased to have material to work with, but resolved to finding a less expensive source in the future. It's good though to know that there is a local source that can help out in a pinch.

Later in the afternoon, I picked up the glass plates that my friend's assistant had cut, and lovingly interleaved with mat board off cuts - 20 sheets to play with! The euphoria lasted until I arrived home to discover that all the plates were larger than 4"x5" by 1/8" in one or both dimensions and wouldn't fit into the holder. Lesson learned - take the holder with me when I want glass plates cut so that the requirements are fully understood. I'll have to individually grind each plate down before I can use them. Still, they were free and a kind gesture from a friend.

Another problem I'll have to deal with is pouring, sensitizing and developing plates. Collodion is a mixture of volatile, highly flammable solvents. Since my darkroom is in the basement of the house, which also has gas furnace and hot water tank, pouring the plates in the house is just not going to work. In addition, my wife is extremely sensitive to odours (which can trigger horrible migraine headaches). I plan to build a dark box to do the plate pouring and processing outside in the garden. For this weekend, I was able to take advantage of my wife being away to try a process where I poured the collodion onto the plate outside (it doesn't have to be in the dark), then sensitize the plate in my darkroom and develop it there after exposure. This keeps the level of volatile fumes (and particularly flammable materials) to a very low amount - not a permanent solution but one that let me do some playing this past weekend.
As it was a holiday weekend, I had three days to get my first "solo" experience with wet plate since taking the workshop with Joni Sternbach. I started with the smallest aluminum plates, using a modified 4X5 holder and my Shen Hao field camera. The image you see above is the second plate I produced using the camera. With this exposure as a guide, I made two additional plates using simple subjects from the garden:

Mexican planter

Studio rain chain

I was quite pleased with these plates - the collodion pour was pretty good, exposures were good and processing went well. I cleaned up, aired out the basement to push any remaining fumes away.

The next day, I continued experimenting, this time using a small studio building in the garden for setting up still life subjects. The studio had two windows and a north-facing skylight, so gets beautiful even illumination. The day was partly cloudy which made judging exposures a bit of a challenge, and I had no idea how UV-light transparent the skylight is. So there was quite a bit of guessing and experimenting going on. The first image I made using a dollar store magnifying glass as a lens - it gives an interesting effect, but I'll need to make an aperture for it to get to a reasonable exposure time (it lets in too much light for shutterless exposure).

Avocado and lemon

I then went back to the Fuji lens I was using the day before to revisit the same still life:

Avocado and lemon redux

If you click on either image to enlarge it, you'll notice the highlights are very "grainy". This puzzled me because wet plate is known for giving virtually grainless, continuous tone images. I had noticed that when I pealed back the protecting film on my aluminum plates there seemed to be a residue left behind on the surface of the plate. With subsequent plates I wiped the surface with some isopropanol to remove this residue, and the problem went away.

Black Pears I

Black Pears II

I finished my plate making with these two images of pears in a deep dish we bought years ago in Taos. Fun images to make because of the poor sensitivity of collodion to yellows, but I did feel a bit sheepish since pears seem to be one of those cliché images that get made a bit too often.

The third day I wanted to try out my Ansco 8X10 camera with a Dallmeyer Perfac brass lens. I had Niles modify two 8X10 film holders for me, one to take a 4"x5" plate. I made several plates - the first in open shade seemed somewhat underexposed, the second taken in open sunlight looked like a good exposure (exposures were quite long for an f6.3 lens, although the bellows extension contributed to that) and the third in mixed shade/direct light was overexposed:

Planter foliage

Foliage and flowers

Planters on the studio porch

Overall I was very pleased with how the weekend went. I'm already thinking of what projects I would like to pursue in wet plate, while at the same time recognizing that I have many more plates to make before I become consistently proficient with this technique. For the moment, I think I'd like to do a nice series on the garden planters we have. Each year, Elena puts together about a dozen planters in these funky, fun mexican pots and I think it would be fun to do a "formal portrait" of each planter. I also would like to explore still life some more. And I'm already feeling the excitement about taking things "on the road" to do some landscapes - for that I'll need to finish that dark box!

Friday, July 1, 2011

Ambrotype Prints - Channeling Chuck Close

I had the opportunity yesterday to get into the darkroom to try printing the ambrotype negative I made last weekend. I have a 4X5 enlarger, but no carrier for glass negatives. I took apart a spare 4X5 negative carrier, and used cardboard to build a glass negative tray on the top half of the carrier. It was an incredible moment when I first saw the enlarged negative, with its continuous tones.

the modified glass negative carrier

in the enlarger

the projected negative
    (click on image to view larger)

I started by making a proof print on Ilford MGIV paper, at grade 2. The print had the rich tones of the tintypes I had made, but seemed a bit cool. So I made a print on Ilford warmtone paper:

fractured self (Ilford Warmtone Paper)
(click on image to view larger)

One of the things I was interested in trying with the negative was lith printing. I started with a lith print on Fomatone MG Classic paper, which was interesting but a bit too orange in tone. I think I might investigate this paper further by following up with selenium toning to see if I can tame the colour.

fractured self (lith print on Fomatone MG Classic Paper)
(click on image to view larger)

I had made a second print on the Ilford warmtone paper with double the correct exposure so that I could try a process called "second pass lith". The idea is to overexpose the print, process normally, then bleach the print partially followed by a second development with a lith developer. I chose to use copper sulphate bleach because it can cause a split-tone or pseudo-solarization with second pass lith. I like this image, it feels as if it references the experiments of Man Ray:

fractured self, rayified (second pass lith print on Ilford Warmtone)
(click on image to view larger)

Finally, I tried a straight lith print on Kentmere Fineprint warmtone paper. I've had hit and miss results with lith printing this paper, it seems very slow to develop and doesn't always give interesting results. However, this print is for me the most successful - it has the creamy tones of a cyanide-fixed tintype combined with shadow detail that has the feel of a charcoal drawing:

fractured self (lith print on Kentmere Fineprint warmtone)
(click on image to view larger)

In future, I have a couple of other paper choices to investigate with lith printing. I'm also looking forward to printing this negative as a salt print and a kallitype. I'm excited about getting everything together to make more ambrotype negatives in my studio so that I can keep pushing this process.

Monday, June 27, 2011

Adventures in Wet Plate

Double Vision
(my first wet plate tintype)
  
I've been learning and working with so-called alternative photographic processes for some time now. I like the idea of using processes that were developed in the first 25-40 years of photographic history, I like the physicality of the resulting prints and I like the fact that by doing these processes I can protect my photographic vision from the potential future loss of currently available analog materials. Whenever a workshop becomes available locally for a new (to me) process, I jump at the chance to take it. So I was very excited when Lúz Gallery announced back in December that Joni Sternbach would be coming to Victoria this June to give a workshop on wet plate collodion. And a good thing I did, since the workshop filled up within a few days.

Tintypes and Ambrotypes from Day 1

It's the day after the workshop, and I confess I'm totally in love with wet plate. And with Joni and her assistant Lisa. I've taken quite a few workshops over the years, and this one was without doubt the best I've ever taken. And in terms of the group of students, definitely in the top 3 of the various groups I've been part of. High level of interest, energy and excitement combined with a great cooperative spirit (important when sharing 2 cameras and 1 darkroom between 9 students), with a wonderful mix of ages and experience.

Elissa Marie self-portrait

Candace - self-portrait

Ottilie - self-portrait (zombie)
tied for the "Sally Mann" award

Lindsay - self-portrait

I think the experience we all had with the wet plate process is perfectly summed up by Lindsay, who posted a photo of her first wet plate result on facebook with the comment "I think I just died and went to heaven like 50 times over and over again. self portrait ambrotype!" I felt pretty much exactly the same.

Susie - self-portrait tintype

Richard - self-portrait tintype

Every student had successful plates, which given the complexities of the process, the chaotic nature of a workshop environment and the two day duration is quite an achievement. All possible because the course was well organized, and both Joni and Lisa are patient, generous teachers who shared their amazing knowledge of wet plate through clear instruction and with a good dose of humour.

Joni exposing the first plate of the workshop

David, Elissa and Ottilie look at the first plate with Joni

The first plate - David, self-portrait


In her book "Mindful Learning", Ellen Langer, a Harvard professor makes the case that students learn more effectively when they are presented with information in shades of grey rather than a cut and dried black or white approach. In any other wet plate workshop of such short duration, students would stick to making plates on trophy tin which doesn't need to be prepared in advance and is slightly easier to work with. And there is a strong argument to be made for such a "KISS" approach to teaching a process like wet plate.

Joni repairing a tear on a plate

Joni and Ottilie discussing equipment options

What was great about our workshop was the built-in "shades of grey": we were exposed to the ideas and working methods of two instructors; we worked in groups of three and could see how each student coped differently with the plate pouring and processing steps; we were encouraged to work with both tin and glass plates to get a range of experiences. I think these design details of the workshop really accentuated the learning process along the lines that Langer describes in her book. And by working not just with tin, we were confronted with problems with emulsion pealing, and making decisions about exposure and developer dilution in deciding between making a positive or negative ambrotype that lead to discussions of what went wrong and how to possibly solve it.

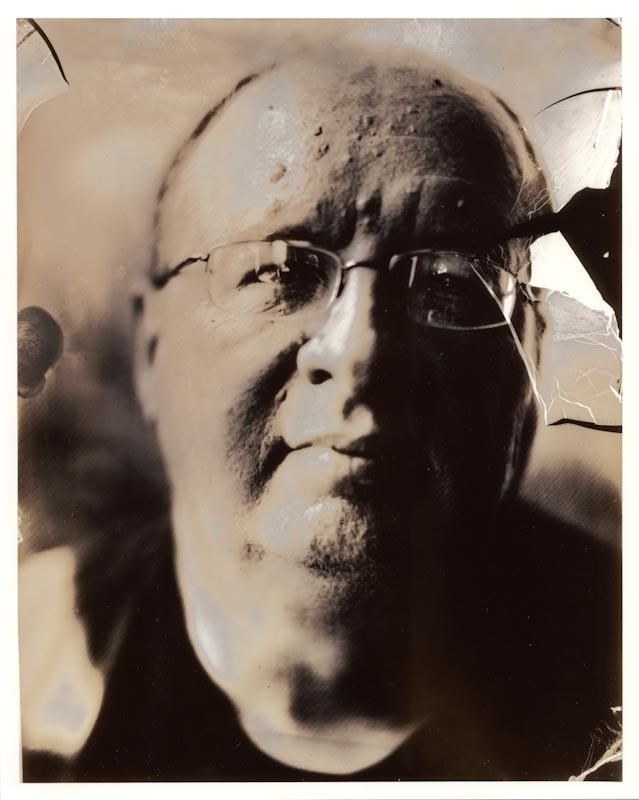
My second tintype - channeling René Descartes

One unexpected fun thing for me was discovering that I like taking portraits. I'm still not crazy about my own self-portraits, although I do like the way wet plate self-portraits look. Gave me new understanding of Chuck Close's longtime fascination with his own self-portrait. We worked in teams of three, so I had a chance to compose and focus selfportraits for both David and Shannon. There's something very breathtaking when you see the image on the ground glass come up with the sharp focus on the subject's eyes. 

I have one additional plate, a clear glass ambrotype exposed to be used as a negative. I'm going to make some prints with it, and will post those results later.

Finally, I have to laugh at myself and a case of caveat emptor. During the meet and greet the first night, when we were each introducing ourselves and saying a little bit about why we were interested in wet plate, I specifically mentioned liking the accidental defects that can happen. As it turned out, I ended up with everything I had asked for (and more). My first plate ended up being double exposed because we were testing a camera and the shutter malfunctioned. I do like the double image. My second plate had quite a journey - it fell off the dipper when I was removing it from the silver tank, and Lisa had to work some magic to get it out, but the plate suffered a scratch (that ended up right across the top of my head in the end). After development (a perfect exposure), the plate had a few oyster shells. Joni was helping me remove them with a small piece of cotton ball, but a bit more emulsion was lifted off than should have happened (around the forehead/eye area). So I have a great plate with "additions" by Lisa and Joni - a keepsake for sure. And my ambrotype negative had a bit of peeling, so I have my own version of a "zombie" plate.

To sum up: the workshop was massive fun, I definitely will set up to do wet plate on my own, and if you ever have a chance to take a workshop with Joni Sternbach - do it!